
What makes pricing tables great?
Let’s talk about your next WordPress pricing table and how you can showcase your prices easily on your website. The role of good pricing tables is to communicate efficiently about your offer. Your pricing plans should look simple, but the difference between them must be clear. When viewing your website, many visitors like to go straight to the pricing page to get an overview of your products/services’ features.
Thanks to your pricing table, future users will be able to pick the right plan for them. For this reason, your feature list needs to be concise and only include what matters to the customer.
The right amount of content
When it comes to communicating about their pricing, many websites will generally provide too much information, which results in a crowded page and often confuses the visitors.
The less content you add to your pricing table, the more impact it has. To put it another way, choose your words wisely and take the time to describe your features with your customers in mind; make sure they know why your products/services are relevant to them. This being said, be sure to provide them with enough information; too little of it and they will skip.
Make it clear what your price is
The main reason people come to your pricing page is to know… well, the price of what you are selling. It is easy to forget about this and focus too much on the rest.
Make sure your price is visible and transparent; tell your customers about any additional fees, whether the price is paid once or if it is a monthly/yearly subscription, for example.
Consistency and plan differences
When designing a pricing table for your WordPress site, use your business’ colors and typography; a good pricing table should blend in your page.
Keep in mind that your plans shouldn’t look too similar, so your visitors understand their differences and are more likely to upgrade. There are several ways to create pricing plans that will stand out, and the “progression” from your first plan to the last one should feel like we are getting more features each time.
Note that you can highlight a particular plan (usually midtier ones) when they are popular or if you think they will be a great fit for most of your visitors.
Responsive Pricing Table for WordPress
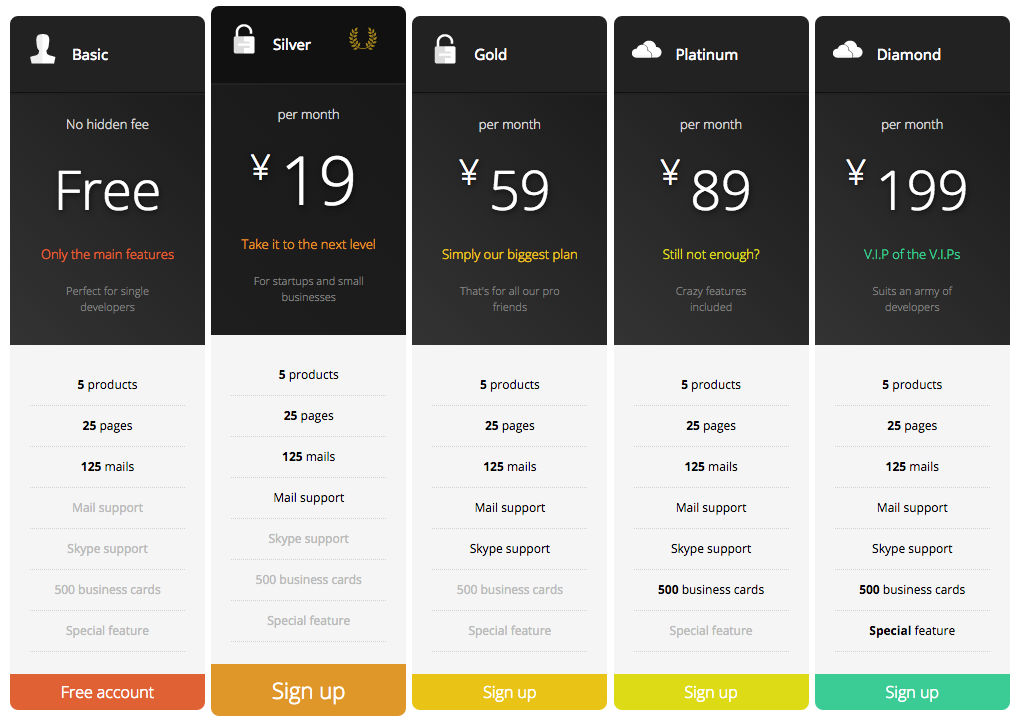
At WP Darko, we have created a pricing table plugin for WordPress: Responsive Pricing Table. This plugin allows you to design and list pricing plans in a matter of minutes and display them anywhere on your WordPress website with a simple shortcode.
Our team has taken care of everything for you. Creating a pricing table with our plugin is as simple as filling up a form in your WordPress back end. Add your price, features, pick your colors, adjust a few settings, and you’re done: you’ll end up with a nice-looking pricing page that implements all of the ideas described above.
Don’t believe this? We’ll take you through it now.
Creating your pricing table
Install and activate our free plugin Responsive Pricing Table and follow these steps:
- Go to the Pricing Tables tab in your WordPress admin panel and click Add New
- Click the Add a pricing plan button (add up to 6 plans by clicking this button again)
- Fill in the plan details section: title, subtitle, short description, price, frequency (in case of any doubt, there are example values for each of these fields)
- Add the plan’s features; note that they can be re-ordered later
- Add a button (button text and button URL fields)
- Pick a color for your plan (you can skip the rest of the styling section for now)
- Repeat these steps for all of your plans
- In the top-right corner, add your currency sign and adjust the text settings if you need
You can preview your pricing table without changing/refreshing the page by clicking the Instant preview button on the top right corner of the editor’s handle.
If you are satisfied with how it looks, you are ready to display it on your site. Click on the Pricing Tables tab. Your shortcode should be in the list on the right (note that you can also find it while editing your pricing table, on the right side of the screen.
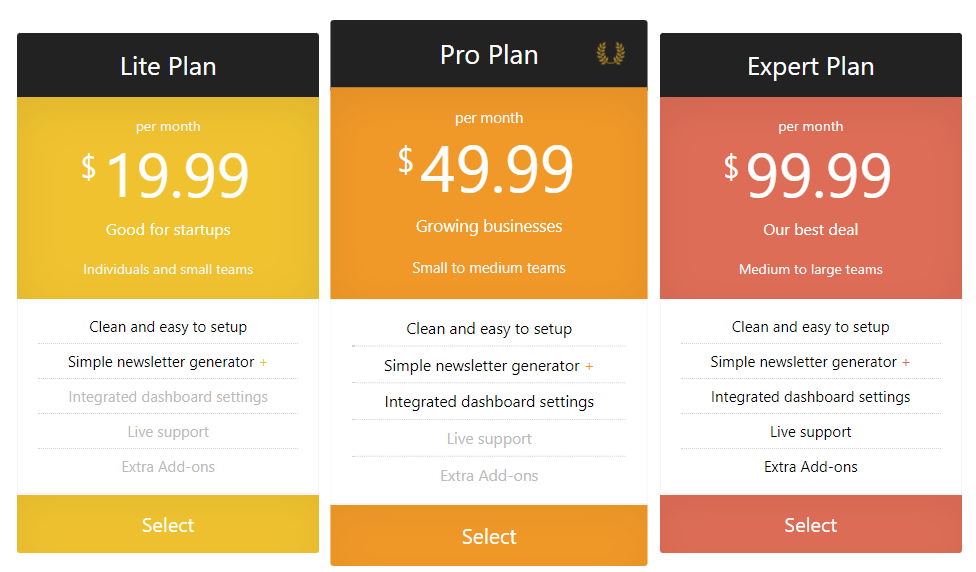
Paste this shortcode in any WordPress Post/Page and visit the link to see what it looks like on your site. You will end up with something that looks like this:
Adding a monthly/yearly pricing switch
Having different subscription options for your services empowers customers to pay the way they want. Providing annual billing discounts, for instance, increases user retention and conversion rate. It is safe to say that nearly all SaaS (Software as a Service) today have monthly and yearly prices, and that’s because it works.
The premium version of the Responsive Pricing Table plugin allows you to add a price toggle to display two different prices with a switch. You can see it in action on this page.
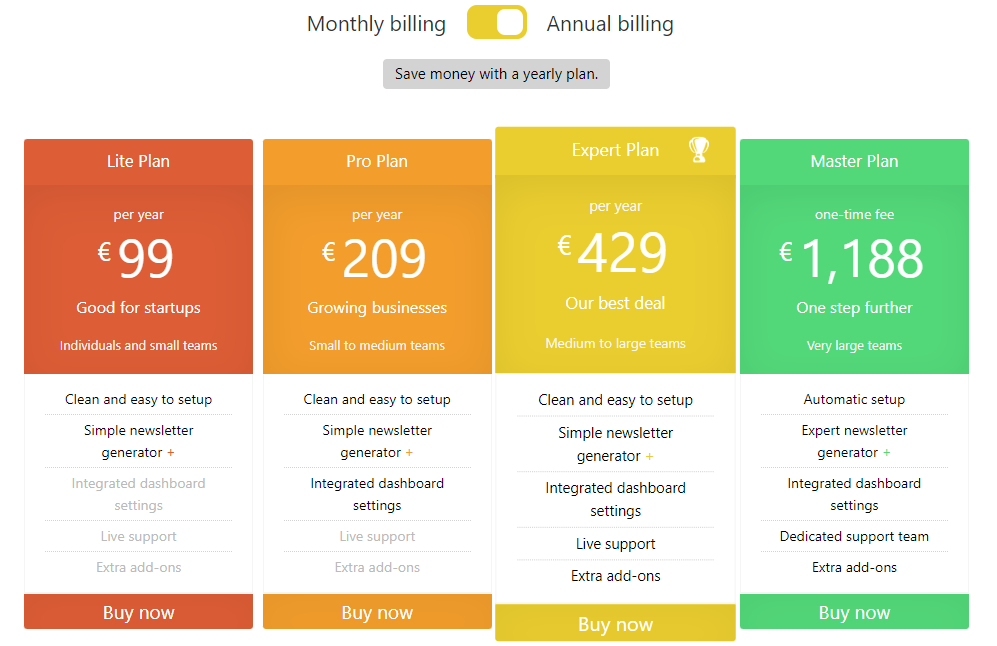
Adding a price toggle in Responsive Pricing Table PRO can be done in a few clicks; follow this guide.
Conclusion
Regardless of what option you’re going for, your pricing page will always be an essential part of your website if you are selling products or services. It is usually what will make or break the sale.
If you put enough time and thoughts into creating a clear and compelling pricing table for your customers, you will surely increase your conversion rate. Good-looking, uncluttered pricing plans mean less friction, and that’s what we want.